Эти бусинки были придуманы в процессе утилизации неудачных колбас. Но поскольку не у всех есть такие богатства, сейчас начнем с нуля. Для работы подберем несколько кусочков полимерной глины, сочетающихся друг с другом, люверсы (не обязательно), нож острый обязательно, скалку или паста-машину, металлическую спицу или шпажку (потолще, чем обычная зубочистка)
The idea of such beads stroke me in a process of utilization of deformed canes. But we’ll start from the very beginning as not all of you might have them at hand. In this tutorial we’ll need several matching pieces of polymer clay, cringles(not obligatory), a sharp blade, a rolling pin or a Conditioning Machine, a metallic knitting pin or a skewer ( a bit thicker than an ordinary toothpick).

Для начала сделаем простую колбаску. Для этого светлый цвет сминаем, делаем бочонок, из контрастного цвета полосочку раскатываем, оборачиваем, и третьим слоем использую самый темный цвет. Колбаску ужимаем, разрезаем ее на 4 части. Если у Вас готовая колбаса и рисунок мелкий, то этот пункт можно пропустить:
At first I make a simple cane. I condition light-coloured clay and make a cylinder. Then I roll a stripe of a darker color and wrap the cylinder with it. At the end I wrap the cane with a dark clay layer. I reduce the cane and divide it into 4 parts. If you have a ready speckle-patterned cane you can miss the following point:

Сплющиваем кейны и складываем рядком с небольшим заступом. Если просто сложить их рядом, ажурность потеряется, будет похоже на паутинку. Раскатываем стопку тонким слоем ( у меня 2 толщина), разрезаем на части и складываем столбиком, подравниваем блок с боков. Если была готовая колбаса с мелким рисунком, то просто раскатываем:
I flatten the canes and set them together in such a way that they spread over each other a bit. If I just set them one beside the other I’ll get a web pattern instead of a filigree pattern. I roll the set of the canes till I get a thin layer (about 2 mm thick) , cut it into pieces and put the layers one atop the other trimming the edges of the block. If you have a ready-made speckled cane, you need just to roll it:
 Разрезаем полученный блок пополам, а потом одну часть по диагонали. Складываем в виде трапеции. Тонко раскатанные слои глины накладываем сверху и все вместе немного раскатываем скалкой или сплющиваем в руках, кончики наискосок срезаем:
I divide the ready block into two parts and cut each part cornerwise. I join the parts in a trapeze form. I cover the top of the trapeze with thin layers of clay and roll it all together a bit with a rolling pin or just with my hands. I cut cornerwise a bit of the top:

Сворачиваем все слои спиралькой, немного ужимаем. Отрезаем края колбасы. Нижний ряд демонстрирует колбасы, полученные из обрезков и старых колбас. Зеленый кейн в центре сделан по технологии из новой глины):
I fold all the layers in a spiral and reduce the cane. I trim the edges of the cane. At the photo below you can see the canes that I’ve made of the rests of old canes. The green cane in the center is made in the technique I’ve described upwards:

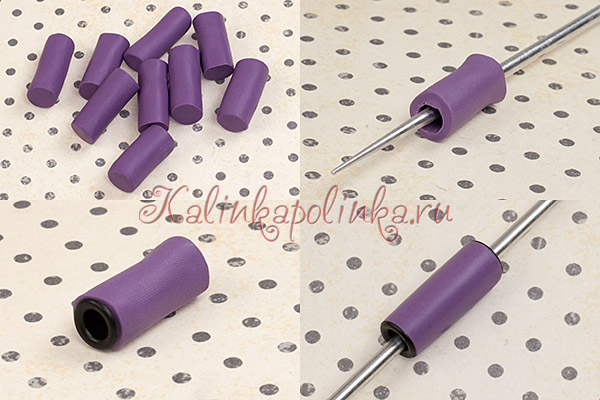
Далее используем колбаску по своему усмотрению. Я решила сделать бусины с люверсами. Для этого нарезала однотонную глину на кусочки размером с пол-мизинца, спицей сделала отверстие, расширила его, вставила люверсы, покатала спицей по столу, чтобы подровнять глину:
Then you can use the cane as you like. I’ve made beads with cringles. To make them I cut unicoloured clay rods into pieces (half little finger long), made holes in them by a knitting pin, set the cringles into the holes and I rolled the beads along the table using the knitting pin to smooth the beads clay surface:

Затем от колбасы отрезала тонкие срезы, приклеила их к трубочке, спицей нанесла рисунок. Налепила чипсов по старому уроку:
Then I cut the cane thinly, attached the slices to the rods and decorated them using the knitting pin. I’ve made chips according to the old tutorial:
Собрала на ювелирный тросик, тросик с помощью кримпов прикрепила к застежке тогглу. Все готово:
I strung the beads onto a crystal thread. I used crimps to attach the crystal thread to a toggle clasp. Here is a photo of the ready work:

Надеюсь, что у Вас все получилось!
Посмотреть другие уроки по лепке можно по ссылке на сайте Главбусина.
I hope the tutorial was of use to you.
Other molding tutorials at our site you can find here.
- Комментарии
